Showing posts with label Dessert. Show all posts

Saturday, 7 June 2014

Baked Date and Apple Spring Roll

Summer is finally here! Sunshine and warm weather are definitely a welcomed change after a brutal 6 month long winter. With summer comes picnics and barbeques! These are perfect perfect for those occasions. They are baked date and apple spring rolls or 枣泥苹果春卷 zǎoní pínggǔo chūnjǔan. These are naturally sweet with no added sugar and are much healthier than their fried relatives.


Spring rolls are generally served during the spring festival in northern and eastern China. The spring festival is commonly known in the west as Chinese New Year or Lunar New Year. "Spring Festival" is the literal translation of the name of this occasion from Chinese. 

These delicacies were considered a once in a year treat but are now available for sale just about anywhere. They traditionally consist of various fillings wrapped in a thin pastry skin and deep fried. 

There are a wide variety of fillings that can be used ranging from the ordinary shredded cabbage, carrots, ground pork, shrimp, eggs, rice vermicelli noodles to the more exotic like:


Source: http://spiceboxtravels.com/2011/06/07/eat-your-flowers-chive-flower-omelet/


Garlic Chives


Source: http://www.sefood.net/products/edible-tree-fungus,-wood-ear-fungus-ID140.html

Wood Ear Mushrooms
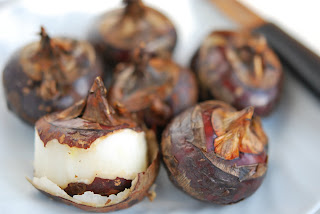

Source: http://www.greenishthumb.net/2010/04/growing-buying-cooking-water-chestnuts.html

Water Chestnuts

The varieties are endless, but they are traditionally savoury fillings. Recently, sweet fillings have been on the rise in popularity ranging from red bean paste to bananas and chocolate.

My twist includes the use of dates.


Ingredients:

Filling:
  • 2 lb Medjool Dates
  • 2 tsp cinnamon
  • 1/4 nutmeg
  • 1/2 salt
  • 1/2 tsp vanilla extract
  • 1/3 cup water and a few tbsp extra
  • 2 small Granny Smith Apples

Apple Soaking Liquid:
  • 1 tbsp lemon juice
  • 3 cups water

Paste:
  • 1/2 cup water
  • 1/4 cup all purpose flour

Other Ingredients:
  • 36 small spring roll wrappers
  • 1/4 cup unsalted butter
  • 1 1/2 tbsp mixed sesame seeds


Method:
  1. Pit and chop the dates into small pieces and place them into a sauce pan.
  2. Add cinnamon, nutmeg, salt, vanilla extract and water to the sauce pan.
  3. Cook the date mixture on low and continuously mash it with a spatula until it becomes a lumpy spreadable paste and set aside to cool. Add additional water if the mixture is too thick. It should be easily spreadable but not soupy.
  4. Peel the apples and cut into fat matchsticks that measure about 1.5 inch in length, 1/4 inch in width, and 1/8 inch in thickness. They don’t have to be exact just about this size.
  5. Place the sliced apple into a large bowl with the 3 cups of water and lemon juice to keep them from browning.
  6. Mix the water with the flour to form a thick paste. This will act as the glue for the spring rolls.
  7. Take a spring roll skin and place it on your work surface in front of you such that a corner is pointing towards you.
  8. Place one heaping teaspoon of the date mixture in a line just below the middle of the spring roll skin closer to the corner pointing towards you. Place four to five slices of apple on top of the mixture.
  9. Roll the corner pointing towards you over the filling. Fold the two side corners into the centre.
  10. Spread some of the flour paste onto the remaining unrolled sides and keep roll until it forms a log.
  11. Place the spring rolls on a greased baking pan. They can be packed relatively close together as they do not expand.
  12. Melt butter in the microwave and brush the tops of each spring roll with a generous layer of butter. This keeps them from drying out too much and becoming hard instead of crispy.
  13. Sprinkle them with sesame seeds.
  14. Bake in a preheated 350 degree oven for 35 minutes or until golden brown.

Video recipe here:


Really hope you give this a try! Enjoy!


Tuesday, 1 April 2014

Vanilla Sponge Cake

These cakes are fluffy, moist and and essential to making Chinese-Western confections. A sponge cake or oven baked cakes in general are called 蛋糕 (dàn gāo) which literally translates to "egg cake" because of the inclusion of eggs in the batter whereas most Chinese cakes to not include egg.


While this style of cake did not originate in China, they have been accepted and adapted into Chinese culture and many changes have been made to make them more appealing to Chinese palates. 

Chinese confections and cakes in particular and much less sweet than their Western cousins. Furthermore, the cakes used and almost always sponge cakes as opposed to pound cake. 


These cakes have also been given different flavours that might seem exotic to Western standards but are quite common in Chinese desserts such as:

Red Bean:


Source: https://blogger.googleusercontent.com/img/b/R29vZ2xl/AVvXsEj5fRWjOR0oq905-ACIUFfug-JtVBt65Dl8E7MwmscrSB24Tw74TJ3lYo9pmxRdAH5mvhqS8SzDaFofpgcmvhnfEMaiMEfLCWzPryUicit_peMd1ae5NVoqOGHL_tUrNTvBT3ZnK6UmLCo/s1600/red+bean+coconut+chiffon+cake+4.jpg

Chestnut:


Source: https://blogger.googleusercontent.com/img/b/R29vZ2xl/AVvXsEi3i8wTydL17yYuxg7qki_lkO1CFBBeYdm_UWkCUDuRffSvHRbNNfHYFeoWeTHBlFaani6CsNVgbYpa4w1Dah3xPPDixcyjurXBI-baGMvkPJqi_Nu9RbpswMrD5NLJcHr7_tvlb5mQ7zk/s1600/chestnut+cake+7.jpg

Fruit cake:
Source: http://angiesbakery.files.wordpress.com/2013/08/untitled-2.jpg

The Chinese concept of a fruit cake is completely different from that of the West. It is soft, fluffy, airy, moist and loaded with fresh fruit. The Western version is dense, heavy, and loaded with dry fruit and often a lot of alcohol.

Also, the Chinese prefer lightly sweetened whipped cream on their cakes as opposed to icings and frostings which are found to be too cloyingly sweet.


The recipe that I developed is the base for any one of these cakes and here it is:

Ingredients:

  • 2 cups all purpose flour
  • 2 tsp baking powder
  • 1/2 tsp salt
  • 2/3 cups white sugar
  • 2/3 cups packed brown sugar
  • 4 eggs
  • 1/2 cup vegetable oil
  • 1 tbsp vanilla extract
  • 1 cup milk

Method:

  1. Sift together flour, baking powder and salt onto a large sheet of parchment paper or into a large bowl. A piece of parchment paper will make dumping the dry ingredients into the wet a lot easier. Set the dry ingredients aside while preparing the wet ingredients.
  2. Separate egg whites from the egg yolks and place them into two different large mixing bowls.
  3. Beat egg whites on low speed until frothy and add the white sugar. Beat mixture on high speed until glossy and stiff peaks form. Set aside while preparing the egg yolk mixture. Make sure the beaters and bowl are free from oil and grease or the whites will not whip properly.
  4. Add brown sugar to egg yolks and beat on high speed until pale. You don’t have to clean the beaters after whipping the egg whites.
  5. Add vegetable oil, milk and vanilla extract to egg yolk mixture. Beat again on high speed until all the ingredients are incorporated.
  6. Pour dry ingredients into egg yolk mixture all at once and beat on low speed to combine. When the mixture is almost completely combined, switch to a spatula and fold in the remaining flour. This prevents overworking the batter.
  7. Add in egg white mixture in two parts and fold to combine after each addition.
  8. Pour into any type of mold you like and bake in a preheated 350 degree Fahrenheit oven. I used normal and mini cupcake mold and it took about 15 minutes.
Video recipe available here:

 
Enjoy! Despite the Chinese preferring whipped cream over icings and frostings, this cake will work well with either. It also tastes great on its own. I really hope you give this a try.


Friday, 3 January 2014

Coconut Sticky Rice Cake

Sticky rice cakes are staple for New Years and Chinese New Years. The Chinese for Sticky Rice Cake is 年糕 (nián gāo) which literally translates to "year cake". It's also a homonym for "high year" or prosperous year and so we like to start the year on a high note and hopefully have a prosperous year to come.

This is my go-to sticky rice cake recipe when I'm short on time and it feeds a lot of people.


Before I get into the how-to, I just want to share a little on the history of these sticky rice cakes in China. It seems I see a lot on how Japanese mochi is made and how Korean Tteok is made, but not much on how Chinese nian gao is made. Mochi, tteok, and nian gao are all sticky rice cakes, but from different countries.

Each region in China has its own style of sticky rice cakes and their own method of preparation. Ningbo, a city close to Shanghai, is famous for its sticky rice cakes. Their style of rice cakes is made through pounding as shown in the image below.
Source: http://www.shanghaitour.net/news/news.jsp?newsid=22361

This is a very similar creation process to Japanese mochi. The image above shows the creation of sweet rice cakes but they also come in bricks which can be used in cooking for both sweet and savoury applications.
Source: http://www.wz11185.com/Product/24056.html

In Shanghai, they are most often used in savoury applications where the bricks are sliced into coins and stir fried with vegetables and meats which I also have a recipe for but haven't had the time to write up yet.
Source: http://www.sunparty.com.cn/detail/album/873124

Other regions have their own version. Here are a couple:

Hong Kong:
Source: http://www.ricebowltales.com/2012/01/red-bean-cane-sugar-cake-water-chestnut.html 
Rice Bowl Tales has an awesome blog with absolutely STUNNING photos. You have have to go check them out!

Haerbin:
Source: http://haerbin.meishitui.com/show/detail-7808184.html?from=album&id=7808184&fid=57551

And more haha. There are A LOT of styles of sticky rice cakes.

I think I've rambled on enough. This is my recipe and it's by no means traditional, but it is easy and quick.

Ingredients:
  • 1 pound glutinous rice flour or sweet rice flour or mochiko which is about 3 3/4 cups
  • 1 cup brown sugar
  • 2/3 cups canola oil
  • 1 1/2 cups coconut milk
  • 1/2 cup evaporated milk
  • 3 eggs
  • 1/2 tsp salt
  • 1 tsp vanila
  • 1 tsp baking powder
  • 1 tbsp toasted sesame seeds
Method:
1. Preheat the oven to 350 degrees Fahrenheit.
2. In a large mixing bowl, combine the flour, coconut milk, evaporated milk, oil and eggs and mix to combine.
3. Add the brown sugar and mix. Then add the salt, vanilla and baking powder and mix. You don't have to mix 3 times, but I like to do it to get a more even consistency and it makes it easier to combine everything.
4. Pour into a greased 8 by 11 baking pan and bake at 350 for 30 to 35 minutes depending on your oven. Mine took 30 minutes.
5. To test if it's done, insert a toothpick into the centre of the cake and if it comes out clean, it's done.
6. Let it cool for 15 minutes before slicing and serving.

Video recipe available here:


Enjoy!


And here are some of the ingredients I used for your reference. Hopefully you'll be able to find it in your local Asian market or grocery store.


Cheers! Happy Cooking and Happy New Year!


Sunday, 21 July 2013

Taro Paste

This recipe is absolutely amazing for filling cakes and sweet buns. It is made out of the mature taro root which naturally has a pinkish-purple colour.


Ingredients:

  • 2 cups taro root (cubed)
  • 2 1/2 tbsp white granulated sugar
  • 2 tsp vanilla extract
  • 4 tbsp milk or cream
  • Pinch of salt
Method:

1. Bring a pot of water to the boil on high and steam the taro for 20 minutes until cooked through on high.
2. Place the cooked taro in a small sauce pan over low heat and mash the taro in the pot. I used a wooden pestle to the mashing.
3. Add the sugar, vanilla extract, milk and salt and continue mashing until fully combined. The mixture will be slightly chunky.
4. Switch to a spatula and stir the paste until you can see small wisps of steam coming from the pot. Take off the heat and let it cool to at least room temperature before using.

If you want a smooth paste, push the paste through a fine mesh sieve. I wouldn't run it through the food processor as it would make the paste have a gluey texture.

I used the paste to make my friend's birthday cake.

I made two 8-inch red bean and vanilla duo cakes.
 I then spread the cooled taro paste on one of the cakes.
 Stacked the second layer upside down on the first cake.

 Covered it all with homemade whipped cream.
And decorated the cake with some homemade chocolate decorations. 


I seriously need to work on my piping skills, but it came out alright and my friends really enjoyed it. Anyhow, HAPPY BIRTHDAY TABBIE!!

Thursday, 27 June 2013

Bailey's Chocolate Truffle

Yay, my first recipe! I made these as a thank you gift along with caramel and chocolate pretzels.

Ingredients:
Recipe can be double, tripled or applied in any multiple. The recipe below makes about 12 truffles.

  • 150g of 50% dark chocolate (1.5 Lindt bars)
  • 3 tbsp Bailey’s Irish Cream or your favourite liquer
  • 1 tbsp heavy whipping cream
  • 1 tbsp unsalted butter
  • 1/2 tsp vanilla extract
  • pinch of salt
  • 100g of white chocolates (1 Lindt bar)
Method:
1. Break 100g of dark chocolate into a bowl
2. Add Bailey’s, cream, vanilla, salt and butter. Microwave for 30 seconds and give it a stir.
3. If the chocolate isn't melted yet, microwave for additional 10 seconds and stir again. Keep doing this in 10 second intervals until the chocolate is melted. Do not microwave for longer as chocolate will burn.
4. Cover with plastic wrap and place in fridge for 1-2 hours to set.

5. Scoop portions using a spoon to make balls with a 1.5cm diameter (approximately).
6. Place on parchment paper lined baking sheet. Cover with plastic and put into fridge to set for 1 hour.

7. Melt white chocolate in the same way as dark chocolate in step 3. Dip each truffle into the white chocolate and place back into the fridge to set for 1 hour (uncovered).
8. Melt the remaining dark chocolate and place in piping bag. Draw streaks over the truffle balls or whatever design you like. Move the decorated truffle balls while the dark chocolate is still wet to a new clean piece of parchment paper.

9. Let set for another hour in the fridge uncovered.

10. Enjoy at your own peril! Highly addictive.